AI Head Swap with Hair: Step-by-Step Guide (2026)
Learn how to do an AI head swap with hair in ZenCreator. Step-by-step workflow with the Face Swap tool — swap head, hair, and jawline naturally (2026).

Face swap tools only move the face oval — the forehead, eyes, nose, mouth, and chin. Everything outside that oval (hair, hairline, ears, jawline contour) stays from the target image. That is fine when the target already has the hairstyle you want. It breaks the moment your source character has a signature look you need to preserve — a sharp bob, long platinum waves, a shaved side, a distinctive hairline.
This guide shows you how to do a full AI head swap with hair on ZenCreator: forehead-to-jawline plus the hairstyle, lit and angled correctly for the target scene. You'll use the Face Swap tool in a slightly non-obvious way — choosing your source crop carefully so the model treats the hair as part of the identity, not as background.
What is an AI head swap with hair, and how is it different from face swap?
A face swap moves only the face oval and blends it onto the target's existing hairstyle. An AI head swap with hair moves the entire head — face, hairline, hair shape, ears, and jawline — onto a target body or scene while preserving lighting and pose.
Most "face swap" tools in 2026 still default to the narrower behavior. They detect 68 to 106 facial landmarks (corners of eyes, bridge of nose, jawline contour) and replace only the bounded region. Hair sits outside that boundary, so it gets dropped. If your source character has waist-length red hair and your target image has a short brunette cut, a standard face swap gives you red-haired character's face on a brunette short-cut head. That is rarely what you want for an AI influencer or a consistent character.
ZenCreator's Face Swap tool works on both images and videos, and it preserves the bounded region (face + immediate surrounding skin) by default. To swap the head including hair, you control the source crop — feeding the tool a source image where the hairstyle is the dominant visual signal, not background noise.
When should you swap the whole head instead of just the face?
Swap the whole head — face plus hair — whenever the hairstyle is part of the character's recognizability. Four scenarios force the upgrade:
- Signature haircut: the character is recognized by their bob, mullet, side-shave, or buzz cut. Losing the cut breaks identity.
- Distinctive hair color: platinum, electric red, two-tone, or any color the target scene cannot match by accident.
- Hair-dependent scenes: beach shots with wind, motion clips with hair flow, close-ups where the hairline is visible.
- AI influencer consistency: the character needs to look the same across hundreds of generated photos and videos. Hair drift between shots is the #1 thing audiences notice.
If you're swapping a face into a fashion shoot where the model already has hair similar to your source, a regular face swap is faster and looks cleaner. The full head swap is the right answer when hair is part of the identity.
How to do an AI head swap with hair in ZenCreator: step-by-step
The full workflow takes about 90 seconds end-to-end. You need a source image where the head + hair occupy a clean foreground and a target scene with similar head angle.
Step 1 — Prepare a source image with the hair visible
Pick or generate a source image where the head is shown three-quarter or front view, hair falls naturally, and the background is uncluttered. Tight crop, head fills 60–80% of the frame. If you don't have one, generate it in Face Generator (app.zencreator.pro/tools/face-generator) — pick hair color and length there, then save the 4K output.
The cleaner the source crop, the better the model preserves the hairline. Hair on a busy background sometimes gets read as part of the scene and dropped.
Here's a real source crop that works — head fills the frame, hair visible on both sides, neutral studio lighting:
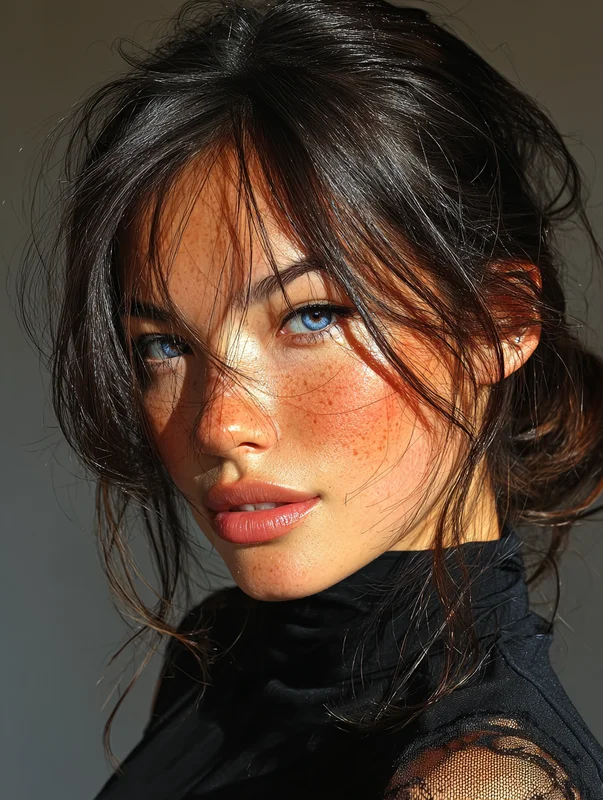
Source crop · head ~70% of frame · hair fully in shot
Step 2 — Pick a target scene with matching head angle
Open Face Swap at app.zencreator.pro/tools/face-swapping and upload your target image — the scene where you want the head to appear. The target's head angle should be within roughly 20° of your source. Front-facing source onto profile-shot target will warp.
For first-time runs, start with a static portrait target. Once the workflow clicks, move to motion scenes. A working example target:

Target scene · three-quarter angle · matches the source within 20°
Step 3 — Select "Full Head (with hair)" and run the swap
In the Face Swap tool, upload source → upload target → open the Model dropdown in the right panel → pick "Full Head (with hair) - 4K" → click Start Swap. The default "Only Face" mode swaps just the face oval and keeps the target's hair; the "Full Head (with hair)" model extends the swap to include the hair, hairline, and jawline contour.
Output appears in 8–15 seconds. Here is a real example of the full input → output flow — the same source face on the same Amsterdam target. The result preview below is the default "Only Face" output, which is what most templates produce out of the box:
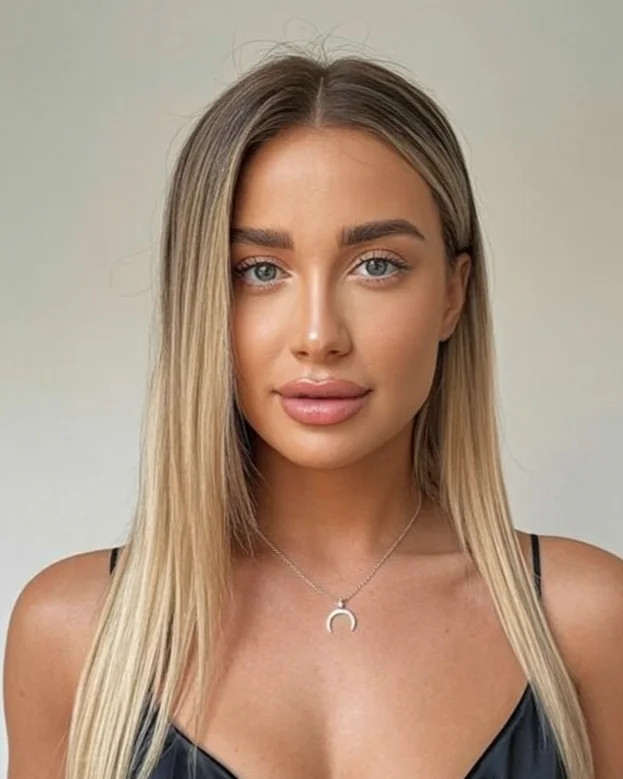
Source face
Target scene

Result (default mode)
Notice that in the default-mode result, the source's messy dark updo did not carry over — the target's sleek shoulder-length cut stayed. That is the regular face-swap behavior. Switch the Model dropdown to "Full Head (with hair) - 4K" and re-run to extend the swap region to include hair. Then check three things on the output:
- Hairline blend: the line where the forehead meets the hair should be sharp, not feathered into a halo.
- Ear edges: ears that show through hair should be solid, not transparent.
- Hair color consistency: the hair color in the output should match your source, not lerp toward the target.
If the hairline is feathered, your source crop had hair on a confused background — recrop with cleaner backdrop and re-run. If hair color drifted, your source had ambiguous lighting — pick a source shot with neutral white-balance lighting.
Step 4 — Upscale to lock in fine hair detail
Drop the output into Upscaler & Enhancer (app.zencreator.pro/tools/upscaler) in Textured mode. Textured mode is tuned for hair strands and fabric — it sharpens individual strands rather than smearing them into a single blob. Output: 2K to 4K with crisp hairline.
For batch workflows (hundreds of AI influencer photos), this last step matters. At thumbnail size the swap looks fine; at full resolution the hair is what tells viewers whether the image is real or compromised.
A motion-scene example — Snowy mountain target with long blonde hair in wind. Source face is the same character template. Same input → output flow:
Source face
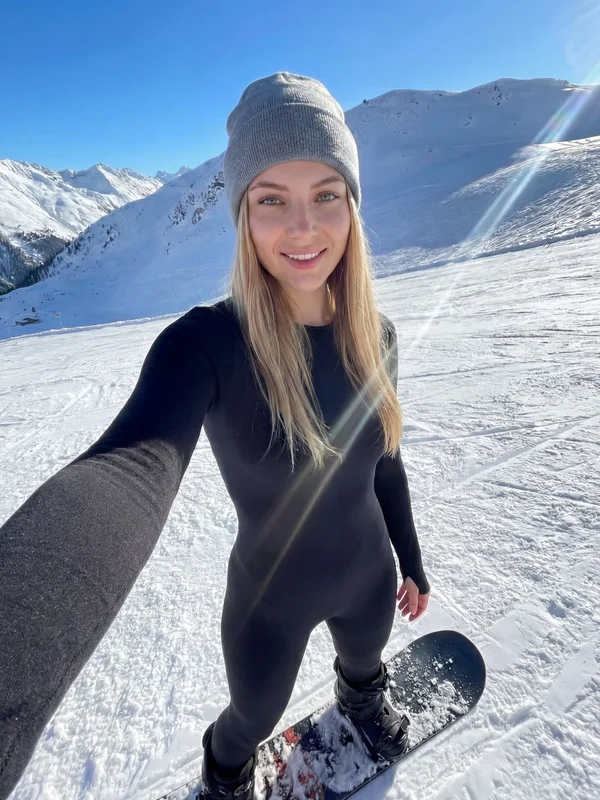
Target scene · motion

Result · upscale-ready
Common mistakes when swapping the whole head with hair
Four mistakes account for most of the bad outputs we see:
- Cropping too tight on the source. If your source crop chops off the top of the hair, the model has nothing to extend with — it fills the missing top with target-image content. Always include 10-15% headroom above the highest hair point.
- Mismatched lighting between source and target. Source lit from above-left + target lit from below-right = hair shadows that don't match face shadows. Pick a source where the dominant light direction matches the target within roughly 45°.
- Asking for a haircut change in the same step. Face Swap preserves what the source shows. If you want a different haircut, change it first in Editor & Combiner or regenerate the source in Face Generator with the new cut, then swap.
- Trusting the first run on motion videos. Face Swap on a still image is 1 frame; on a 5-second video it is 120+ frames. Hair occlusion (hands brushing through, wind blowing strands) trips frame-to-frame consistency. For motion clips, see the dedicated AI Face Swap Video guide.
Where this fits in a character-consistency pipeline
The head swap is one step in a larger pipeline most AI influencer creators run:
- Face Generator → generate the canonical character face + hair (one time, save as the reference)
- PhotoShoot or Text-to-Image → produce target scenes in 40+ themed categories
- Face Swap (full head) → apply your reference head onto each scene — this guide
- Upscaler (Textured mode) → sharpen hair strands at 4K
- Image-to-Video → animate the result if you need motion clips
The head-with-hair swap is what makes the rest of the pipeline cohere. Without it, every scene shows a slightly different face/hair combination and the character reads as inconsistent. With it, you can generate hundreds of scenes with the same identity locked in.
For longer-form motion, see our complementary guides on AI Face Swap Video, AI Face Swap GIFs, and the free face swap tools roundup for context on how ZenCreator's approach differs.
Try these Face Swap templates
These templates let you skip the source-prep step entirely — each one already has a strong head-and-hair reference baked in. Upload your face, run the template, get a finished scene.
Amsterdam canals
Red in opulent mini dress
Vitiligo charm
Making selfie
Morning lip liner routine
Snowy mountain hill
Frequently asked questions
Does Face Swap on ZenCreator move the hair too?
By default, Face Swap moves the face oval and the immediate surrounding region. To extend the swap to include the full hairstyle, control the source crop — feed the model an image where the hair is the dominant visual signal in the foreground and the background is clean. The model then treats the hair as part of the identity to preserve.
Can I swap a head onto a video, not just an image?
Yes. ZenCreator's Face Swap tool runs on both images and videos. On video, the same source identity gets applied frame by frame with temporal smoothing. Hair preservation on motion clips is harder than on stills — the more head turn and hair movement in the target, the more frames the model has to negotiate. Start with simple talking-head targets, then move to motion.
Why does my swapped head end up with the target's hair color?
Two common causes. First, your source crop had ambiguous lighting that confused the color reference — pick a source shot with neutral white-balance studio lighting. Second, your source had the hair on a complex background — the model dropped some of the hair as scene noise. Recrop with a clean backdrop (plain wall, soft gradient) and the color holds.
Can I change the haircut during the swap?
No — Face Swap preserves what the source shows. If you want a different cut, change it first in Editor & Combiner or regenerate the source in Face Generator with the new cut, then swap. Trying to do both in one step usually fails.
How long does a single head swap take?
For a still image: 8–15 seconds end-to-end. For a 5-second video: roughly 60–90 seconds depending on the resolution and the engine you pick downstream. Batch processing 50 images runs in about 6–8 minutes total.
What's the minimum source resolution that holds at 4K output?
Start with a source crop of at least 1024×1024 around the head. Anything smaller and the Upscaler step has to invent strand-level detail rather than sharpen what's already there. 1664×1664 or larger gives the cleanest 4K result with the Upscaler in Textured mode.